Introduction
Based on the concept of a project object model (POM), Maven can manage a project’s build, reporting and documentation from a central piece of information. Default project structure for maven build is given below.
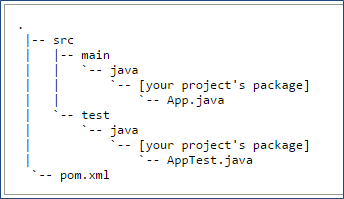
The setup for Maven Build can be done from Eclipse or command prompt. Below are the core elements for the Maven build
settings.xml
In this file you can define your local repository, proxy, JDK version etc. You can place your settings.xml file into %maven_home%/conf/ path.
Please note: If you do not define your localRepository in the settings.xml file then default repository would be %USER_HOME%/.m2/repository
pom.xml
pom.xml file is the heart of maven build. It should be placed under the project folder. This file will be discussed in more details.
Maven Setup
Maven setup in windows
- Download maven zip from official site
- Unzip at some location
- Add M2_HOME environment variable with the PATH_TO_MAVEN_UNZIP_FOLDER

- Update PATH variable with Maven path (PATH=MAVEN_UNZIPPED_FOLDER\bin;%PATH%)

- Verify if installation is successful

Check if maven plugin is available in your eclipse
Normally maven comes with eclipse IDE for J2EE. To check, follow the below steps
- Open eclipse
- Go to Windows->Preference
- Check for Maven entry in the left hand side
If maven plugin is not there in your eclipse then follow the below steps to install the plugin in Eclipse
- Help->Install new software
- Click Add button at top right corner
- At pop up: fill up Name as “MavenPlugin” and Location as http://download.eclipse.org/technology/m2e/releases
- Now click OK
- Once installed then restart the eclipse and check if maven plugin is available in your eclipse
Check setting.xml file
The default location for the settings.xml is ${user.home}/.m2/settings.xml. However, user can change this location in eclipse/cmd prompt. Changing in eclipse is very easy.
- from eclipse: Go to Windows->Preference->Maven->User Settings and mention

- from cmd prompt: settigns.xml should be at {M2_HOME}\conf\setting.xml
Repository
The default repository location is ${user.home}/.m2/repository. However, user can change this in settings.xml file as shown below
<localRepository>path\to\repository</localRepository>
Internet connection
The maven must connect to the internet (or copy the working repository then internet connection is not required) for the first time. To connect to the internet: make sure the proxy tag is correct in your settings.xml
<proxy>
      <id>optional</id>
      <active>true</active>
      <protocol>http</protocol>
      <username>proxyuser</username>
      <password>proxypass</password>
      <host>proxy.host.net</host>
      <port>80</port>
      <nonProxyHosts>local.net|some.host.com</nonProxyHosts>
</proxy>
Mention the maven repository in pom.xml
In pom.xml, if repository is not mentioned then by default then it will look into local repository. If not found then it will look into maven central repository (i.e. http://repo1.maven.org/maven2/). If not found then it will look for the maven remote repository. Below remote repository configuration is required in pom.xml
<repositories>
	<repository>
	    <id>java.net</id>
	    <url>https://maven.java.net/content/repositories/public/</url>
	</repository>
</repositories>
Create a maven project
Create Maven project from Eclipse
- Create a normal project in eclipse
- Right click on the project -> Configure -> Configure to Maven project
Create Maven project from cmd prompt
- Create a project folder
- Then execute the following
mvn archetype:create
-DgroupId=com.test
-DartifactId=ArtifactName
Build Java project
In this example, we are going to create an executable jar, place it into another location Follow comments added in each steps in pom.xml file. I have tried to cover all possible scenarios in my pom.xml to create an executable Jar file.
- It defines the dependencies (jars) and their scope.
- If the scope is system then it picks the jar from the hardcoded location
- If the scope is test then the testing files does not get copied into the final jar
- Define the JDK version
- Copy resource files (e.g. .properties or .bat) into required folder
- Copy dependant jar files into ${outputPath}/lib folder
- Create executable jar with depandant jars as entry into manifest.mf file
- Copy the jar into final destination
- Also declare variables which are used across the pom.xml
For details, check this pom.xml file
Call ant build from maven script
If you are using JDK1.4 or below then maven does not offer much plugings. So to achieve something you may need to run ant target or ant scripts from maven. This file shows how to call ant script from maven build.
Common issues during maven setup
| SL NO | Issue | Solution |
|---|---|---|
| 1 | Could not calculate build plan: Plugin org.apache.maven.plugins:maven-resources-plugin:2.5 or one of its dependencies could not be resolved | Maven is not able to connect to the internet. Follow the step 5 or copy working repository into your system |
| 2 | ‘build.plugins.plugin.version’ for org.apache.maven.plugins:maven-compiler-plugin is missing | Add <plugin> <artifactId>maven-compiler-plugin</artifactId> <version>2.3.2</version> INSTEAD OF <plugin> <artifactId>maven-compiler-plugin</artifactId> |
| 3 | [WARNING] File encoding has not been set, using platform encoding Cp1252, i.e. build is platform dependent! | Add the below line in your pom.xml <properties> <project.build.sourceEncoding>UTF-8</project.build.sourceEncoding> </properties> |
| 4 | Internet is working but maven install is not able to download jars from internet | Check <proxy> settings in the settings.xml file. There might be a chance that your browser proxy settings and maven proxy settings are different |